Showing posts with label Christmas. Show all posts

Saturday, 7 December 2024

Sweet Stampin' Challenge

 Saturday and time for a new

Sweet Stampin Challenge 

The theme from Team Wendy is

Christmas 

I've made a little Christmas gift bag. I used one of the beautiful images from the Gingerbread House digi set from Vera Lane Studio. The Merry Christmas sentiment die is from AALL & Create.


Don't forget to pop by the Sweet Stampin Challenge Blog to see all the other fabulous DT projects.

Remember you must use some stamping ( rubber, clear or digi)

Cass xx 

Saturday, 3 December 2022

Sweet Stampin Challenge

 Saturday and time for another  

Sweet Stampin' Challenge

 
The theme from Team Wendy is
 
Anything Christmas
 
 I've made a money wallet for my Anything Christmas project this week. I cut the candy cane border using the Whimsy slimline die and cut it down to size. I then matted the candy cane paper onto my card base and adhered the border. I coloured the Christmas Gnome with my Copics and fussy cut him out. I sat him on a coloured candy cane and added the LOTV sentiment below. I added the name using the Tim Holtz alpha and some candy sweet embellishments to finish. Inside I added a pocket at the bottom of the wallet so money could be secured in it.


Image - Lee Holland
 
Colouring Medium - Copic Markers
 
Dies - Whimsy, Tim Holtz Alpha
 
Sentiment Stamp - LOTV 

Candy Sweet Embellishments
 

Don't forget to pop by the Challenge Blog and see all the fab DT creations from Team Wendy.
Remember you MUST use a stamp (Rubber,Clear or Digi)
 
 TFL
Cass xx


Saturday, 4 December 2021

Sweet Stampin' Challenge

 Saturday and time for another  

Sweet Stampin' Challenge

 
The theme from Team Wendy is
 
Anything Christmas
 
I matted my patterned paper from Carta Bella onto my card base.
I then coloured the image of the sweet elephants from Digi Stamp Boutique which is sadly no longer around. I added some glamour dust to the hats for some Christmas sparkle. Once that was done I cut it out with my Whimsy stamps zig zag frame die and adhered it to the card.
Next I used some Stick It sheets on the front and back of my white card and die cut the snowflakes and sentiments. I added glamour dust to the fronts and then adhered them onto the card. To finish off I added some glittery snowflake pearls to the centres of the snowflakes.


Image - Digi Stamp Boutique

Colouring Medium - Copic Markers

Papers - Carta Bella
 
Whimsy Stamps Zig Zag Frame

Snowflake Dies - Memory Box

Word Dies - Sizzix Tim Holtz
 
Stick It Adhesive Sheets

Glamour Dust

Don't forget to pop by the Challenge Blog and see all the fab DT creations from Team Wendy.
Remember you MUST use a stamp (Rubber,Clear or Digi)
 
 TFL
Cass xx

Wednesday, 1 December 2021

Crafts Galore Encore - December Challenge

As it's the first of the month, today I'm sharing my DT card for Crafts Galore Encore.  

For December it's another anything goes challenge.

The sponsor this month is Gecko Galz and the prize is a $25  Gecko Galz store voucher.

 I printed out one of the images from the Santa Clause Lane digital collage set. I used Echo Park papers and tore the edges to give a distressed look. I then inked them with Festive Berries distress oxide. Next I wrapped some twine around one of the pieces and adhered it in place. I offset the image over the other rectangle and adhered them in place.

I added the wooden Christmas sentiment and the nuvo drops and finished off by mounting it onto a red card.


Image - Gecko Galz (Santa Clause Lane Digital Collage Set)

Papers - Echo Park

Distress Oxide - Festive Berries

Twine

Christmas Wooden Embellishment

Nuvo Drops

Don't forget to pop by the Crafts Galore Encore challenge blog to see all the fab DT creations.


Sunday, 28 November 2021

Whimsy Stamps - Pollycraft Candy

I'm sharing a slimline card today featuring the Pollycraft Candy digi stamp as part of the Digital Diva's DT for Whimsy Stamps.

 I inked my background panel using Tumbled Glass, Salty Ocean and Prize Ribbon distress oxides. I then ran it through the Sweater embossing folder and splattered some white paint using my white Posca pen. I then cut out the Slimline Twisty Frame in white and added some blue cardstock underneath. Once I adhered it to the background panel I added some Glitter Snow at the bottom and added the image which was coloured with copics. I added the Merry Christmas sentiment and doodled around the edge with my black fineliner. To finish off I added the sticky snowflakes.


  Whimsy Products Used


Distress Oxides - Tumbled Glass, Salty Ocean and Prize Ribbon

Aleene's Glitter Snow
 
White Posca Paint Pen

Sticky Snowflakes

Clear Wink Of Stella

White Gel Pen

Black Fineliner

Check out all the other inspiration on the Whimsy Stamps And Inspiration Facebook group.


Sunday, 21 November 2021

Whimsy Stamps - Snowman's Birdie Friend

I'm sharing a card today featuring the Snowman's Birdie Friend digi stamp as part of the Digital Diva's DT for Whimsy Stamps.

 I coloured him with my copic markers and paper pieced his scarf, hat and mittens using blue card which I ran through the Sweater slimline embossing folder. I cut trees from the Trees Assortment die set to create my background. I also added some clouds using the extra clouds in the Clouds slimline die. I adhered the image and stamped one of the sentiments from the Gnome For The Holidays stamp set.

To finish off I added lots of clear Wink Of Stella to make it look frosty. It doesn't show very well on the photo though.


Whimsy Products Used


Clear Wink Of Stella

Check out all the other inspiration on the Whimsy Stamps And Inspiration Facebook group.


Monday, 15 November 2021

Whimsy Stamps - Christmas Elf

I'm sharing a slimline card today featuring the Christmas Elf digi stamp as part of the Digital Diva's DT for Whimsy Stamps.

 I cut out the Slimline Scenic Window die in white card and splattered it with my red, green and white Posca paint pens. I cut a panel from the Christmas Red, Gold Green digi papers and matted the paint splattered panel on top. I then adhered it to a panel of red card.

Next I printed the elf, coloured him with my Copic markers and fussy cut him out. I then stamped the sign from the Gnome So Thankful stamp set and coloured it in. I then stamped the Jingle and the All The Way stamps from the Gnome For Christmas stamp set and heat embossed in black.

I adhered them to the card to finish it off.


  Whimsy Products Used


Posca Paint Pens - Red, Green and White

Red Card

White Gel Pen

Versamark Ink Pad

WOW Primary Ebony Black Embossing Powder

Check out all the other inspiration on the Whimsy Stamps And Inspiration Facebook group.


Sunday, 7 November 2021

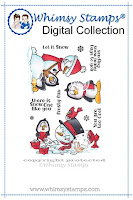
Whimsy Stamps - Frosty Hugs Part 2

I'm sharing a slimline card today featuring one of the images from the Frosty Hugs digi stamp set as part of the Digital Diva's DT for Whimsy Stamps.

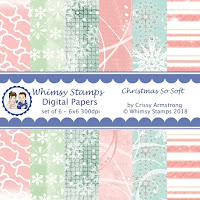
 I cut out the slimline waves die in white card and matted it onto a panel of patterned paper from the Christmas So Soft paper pack.. I filled in two of the panels with the white card infills that were left from die cutting. One with the sentiment on it. I then coloured in the penguin from the Frosty Hugs set and fussy cut him out. I adhered him to the card and finished with a few pearls.


  Whimsy Products Used 


 White Gel Pen

Pearls

Check out all the other inspiration on the Whimsy Stamps And Inspiration Facebook group.


Tuesday, 2 November 2021

Whimsy Stamps - Frosty Hugs

November Already!

I'm sharing a slimline card today featuring one of the images from the Frosty Hugs digi stamp set as part of the Digital Diva's DT for Whimsy Stamps.

 I've gone for a Southern Lights (Aurora Australis) inky sky background. I used Cracked Pistachio, Wilted Violet and Chipped Sapphire distress oxides and blended them together to look like the sky. I added some white card to the bottom and then cut the panel out using the Slimline Cardbuilder die. I coloured my image of the cute snowman and penguin hugging with my copic markers adding some knitted effect with my prismacolour pencils. Once they were adhered in place I added some Viva Decor ice crystals and finished off with one of the sentiments from the set.


  Whimsy Products Used


Distress Oxides - Cracked Pistachio,Wilted Violet, Chipped Sapphire

Viva Decor Ice Crystals

White Posca Paint Pen

White Gel Pen

Check out all the other inspiration on the Whimsy Stamps And Inspiration Facebook group.


Saturday, 25 September 2021

Sweet Stampin' Challenge

  Saturday and time for another  

Sweet Stampin' Challenge

 
The theme from Team Wendy is

Christmas In September 

I've used this cute Santa Gnome from LOTV for my card. I coloured him with my Copic markers and fussy cut him out.
I used the snowy LOTV digi papers and matted it onto my card base.
I added some white glitter card for the snow and cut out the Sue Wilson trees with it too. 
I stamped the sentiment and heat embossed it with white embossing powder.
To finish off I added the snow acetate on top.


Image - LOTV

Colouring Medium - Copic Markers 

Papers - LOTV

Dies - Sue Wilson

Snowy Acetate - Crafter's Companion

White Glitter Card


Don't forget to pop by the Challenge Blog and see all the fab DT creations from Team Wendy.
Remember you MUST use a stamp (Rubber,Clear or Digi)
 
 TFL
Cass xx

Saturday, 5 December 2020

Vera Lane Studio - Not Driving Home For Christmas

Happy Saturday!

Today I'm sharing my Vera Lane Studio DT project featuring 3 sets which are available in the Vera Lane Studio Etsy shop.

I wanted to make a bright Christmas coloured project and inject a bit of humour. Goodness knows we need some after the year we've had. I decided to use the Chris Rea song Driving Home For Christmas or as in the case may be, Not Driving Home For Christmas depending on local travelling and visiting restrictions.

I've used the car from the Wheels set, the girl from New Day and the tree from Merry.

I know it's not the typical American red truck but I love this little red car so added the tree on top. The girl from New Day looks like she's shaking her finger and saying "no" so I thought she would be perfect.


I brayered red, white and green acrylic paint onto my gelli plate and pressed down onto it with some bubble wrap to add some texture. I then used Vanilla acrylic paint to lift the print. I then stamped AALL And Create #399 Framework Elements in Rustic Wilderness Distress Oxide and #352 Circled Numbers in Festive Berries. Next I stamped #434 Newsprint Numbers in Versafine Clair Nocturne black.  I then used the top of two pen lids and stamped circles in Snowflake white.

Next I adhered my images and added some doodling below them with my black fineliner. I added the word Journey from the AALL And Create washi tape in the top left corner and then printed out my sentiment, underlining the word NOT in red. I finished by adding this to my project.

I loved making this tongue in cheek scene and hope it brought a smile to your face.


Images - Vera Lane Studio (Wheels, New Day, Merry)
Colouring Medium - Copic Markers
(E13,11,21,00,R14,27,46,G24,46,28,C3,1,YR21,23,27,0)
Stamps - AALL And Create (#434 Newsprint Numbers, #399 Framework Elements, #352 Circled Numbers) 
AALL And Create - Washi Tape
Paints - Paperartsy Fresco Snowflake, Vanilla, Dina Wakley  Lime, Red Acrylic
Distress Oxides - (Rustic Wilderness, Festive Berries)
Versafine Clair Nocturne
Brayer
Gelli Plate
Bubble Wrap 
Black Fineliner
 

We would love to see your makes over on the Vera Lane Studio Facebook Group or tag us on Instagram using #veralanestudio

Cass xx
 
White Gel Pen


Saturday, 28 November 2020

Sweet Stampin' Challenge

 Saturday and time for another 

Sweet Stampin' Challenge

 
The theme from Team Wendy is
 Spots Or Stripes

I've made another slimline card using another elf!
 
This elf digi I bought way back in 2012 when Birdie Brown had a digi stamp shop on Etsy. I coloured him with my Copic markers.
I made my slimline card blank using green card and added a panel of red and white stripey paper. I cut a panel of white card and adhered my elf to it.
I then doodled around the edge with my black fineliner.
Next I cut the sentiment die in green card and added it.
To finish off I added some pearls.
I love this image so much.


Image - Birdie Brown (Elf)
Colouring Medium - Copic Markers
Papers - AMB Illustrations
Die - Creative Expressions
Black Fineliner
White Gel Pen
Pearls

Don't forget to pop by the challenge blog and see all the fab DT creations from Team Wendy.
Remember you MUST  use a stamp (rubber or digi)
TFL
 
Cass xx


Saturday, 14 November 2020

Vera Lane Studio - Winter To Spring

 Happy Saturday!

Today I'm sharing my Vera Lane Studio DT project featuring Winter to Spring which is available in the Vera Lane Studio Etsy shop. 

There are  7 digis in the set and I decided to use the Winter set for my card. I coloured the girl and the trees using my Copic markers and cut them out. I also printed out the sentiment, cut it out and inked it.

For my background I spritzed some Frayed Burlap and Speckled Egg Distress Oxides on my glass mat and smooshed my card in it. Once it was dry I added some Glitter Snow Paste using a spatula to create the snow at the bottom. I then used  Janet's AALL and Create Stencil #96 Dandelion Field and spread the paste carefully through some of the circles to create the snow over the rest of the card. It picked up some of the Frayed Burlap colour from below but I like the aged look it gave.

I then stamped the Merry Christmas from Janet's AALL And Create #413 Merry And Bright stamp set over the background in Frayed Burlap and also #383 Scripted Hexagons by Bipasha BK. I added the sentiment to finish it off.


Images - Vera Lane Studio (Winter To Spring)

Colouring Medium - Copic Markers (E13, 11, 21, 00, BG11, 32, 13, 15, E30,31, 33, 35, E37)

Distress Oxides - Frayed Burlap, Speckled Egg

Stamps - AALL And Create (#413 Merry And Bright, #383 Scripted Hexagons)

Stencil - AALL And Create (#96 Dandelion Field)

Glitter Snow Paste

White Gel Pen

We would love to see your makes over on the Vera Lane Studio Facebook Group or tag us on Instagram using #veralanestudio

Cass xx

Sweet Stampin' Challenge

 Saturday and time for another 

Sweet Stampin' Challenge

 
The theme from Team Wendy is
 
Use Your Favourite Stamp
 
I don't have one single favourite stamp. I've got too many favourites. So I decided to go with my favourite of the moment which is this adorable little elf  called Buttons Elf from Sweet November Stamps. Isn't he just so sweet with his little teddy bear?

I coloured him with my copic markers and cut him out along with the candy canes. I used the Whimsy slimline scenic window die and cut it out in white card. I stuck it to my base card which I'd matted with a candy cane stripe paper.
I then added Buttons and the candy canes in their respective windows. I stamped the Elf & Safety sentiment and added it it to the top window.
I finished off with some flat back pearls.
Definitely a favourite!


 Image - Sweet November Stamps (Buttons Elf)
Colouring Medium - Copic Markers
Dies - Whimsy Stamps (Slimline Scenic Window)
MFT (Pierced Rectangles)
Pearls
White Gel Pen
Red Bow

Don't forget to pop by the challenge blog and see all the fab DT creations from Team Wendy.
Remember you MUST  use a stamp (rubber or digi)
TFL
 
Cass xx