Pages

Saturday, 26 December 2020

Vera Lane Studio - Baby It's Cold Outside

Happy Boxing Day!

Today I'm sharing my Vera Lane Studio DT project featuring Dog Lover which is available in the Vera Lane Studio Etsy shop.

I had this lovely textured card with a snow blizzard effect. I stamped with AALL and Create #80 Lined and #307 Overlapping Texture randomly around the edge using Versafine Clair Morning Mist. I also stamped #307 Overlapping Texture in Paperarty Snowflake white paint in some random areas too. I inked around the edges first with Hickory Smoke Distress Oxide and then with Black Soot. I stamped the number stamp in #338 Background Noise with Versafine Clair Nocturne. 

I used the white Molotow acrylic paint pen to create splatters over the panel. I then stamped one of the paint splats from #338 Background Noise in Versafine Clair Nocturne.

I coloured my image and dog using my copic markers in shades of grey and black, adding texture to her scarf and hat. I also added textured to the "doodle" dog. Some white gel pen highlights to finish off.

I then adhered them in place on the stamped paint splat.. Finally I added my PC printed sentiment and doodled around the edge with my black fineliner.


Image - Vera Lane Studio (Dog Lover)

Colouring Medium - Copic Markers

(E13,11,00,R22,C0,1,3,5,7,9,0,E70)

Snow Blizzard Textured Card

Stamps - AALL And Create #80 Lined, #307 Overlapping Texture, #338 Background Noise

Paperartsy Fresco Acrylic Paint - Snowflake 

Versafine Clair - Morning Mist, Nocturne

Distress Oxides - Hickory Smoke, Black Soot

Molotow White Acrylic Paint Pen

White Gel Pen

Black Fineliner 


We would love to see your makes over on the Vera Lane Studio Facebook Group or tag us on Instagram using #veralanestudio

Cass xx


Saturday, 19 December 2020

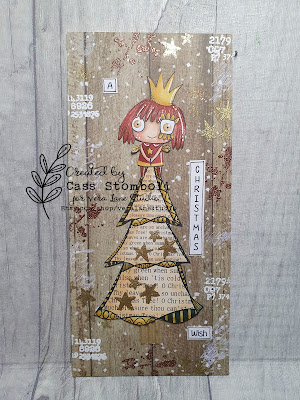
Vera Lane Studio - A Christmas Wish


Happy Saturday!

Today I'm sharing my Vera Lane Studio DT project featuring Live Joyfully and Christmas Tree which are available in the Vera Lane Studio Etsy shop.

I wanted to make a little slimline plaque. I used some wood effect paper I had with snow on it and cut it down to 7.5x3.5 inches. I them stamped randomly over the edges using some of the stamps in the  AALL And Create #338 Background Noise set using Versamark clear ink. I then heat embossed them in Copper, Gold and white WOW embossing powders. I also stamped one of the stamps with Paperartsy Fresco Snowflake White acrylic paint. I then glued it down onto some greyboard to give it some strength.

I merged one of the trees from the Christmas Tree set and  one of the girls from Live Joyfully with her crown so she looked like a fairy.

I coloured her in Copper and Gold tones to keep with the colour scheme, and added some white highlights with my gel pen and some clear Wink Of Stella to her wings and crown. I used the star stamp from the AALL And Create #419 Moonlight set and stamped and embossed with gold embossing powder on the Christmas tree. To make the trunk I added a little bit of corrugated card for some texture.

To finish off I printed out the sentiment and doodled around the edge with my black fineliner.


Images - Vera Lane Studio (Live Joyfully, Christmas Tree)

Colouring Medium - Copic Markers

(E13,11,21,00,R21, E50,51,53, E07,07,19, Y21,YR21,23)

Stamps - AALL And Create #338 Background Noise, #419 Moonlight

Copper,Gold and White WOW Embossing Powders

Paperartsy Fresco Acrylic Paint - Snowflake

Paper - Carta Bella (Christmas)

Greyboard

White Gel Pen

Black Fineliner

Clear Wink Of Stella

We would love to see your makes over on the Vera Lane Studio Facebook Group or tag us on Instagram using #veralanestudio

Cass xx


Sweet Stampin' Challenge

 Saturday and time for another 

Sweet Stampin' Challenge

 
The theme from Team Wendy is
 
Last Minute Christmas
 
I've used this super cute Gingerbread Nordic Gnome from ScrapflowerEStudio for my card. I coloured him with my copic markers in gingerbread colours. I also printed out a few more of the gingerbread man on his hat to add to the card.
I wanted to give the impression of gingerbread with white icing so decided to make the card with kraft and doodle with my white gel pen. I cut a slimline card and also the Whimsy Scenic Window slimline die from kraft. Once I had adhered the window panel I used my white gel pen to doodle all around it. The central panel I embossed white snowflakes using white WOW embossing powder. I also added one to the gnome's hat.
I added the gnome and the mini gingerbread men to the card. To finish off I embossed the Whimsy stamps sentiment in white embossing powder and added it to the card.

I really love this kraft and white look!


Image - ScrapflowerEStudio (Gingerbread Nordic Gnome)
Colouring Medium - Copic Markers
Dies - Whimsy (Scenic Window )
Sentiment Stamp - Whimsy Stamps (Gnome For Christmas)
Snowflake Stamp
WOW Embossing Powder
Kraft Card
White Gel Pen
 
Don't forget to pop by the challenge blog and see all the fab DT creations from Team Wendy.
Remember you MUST  use a stamp (rubber or digi)
TFL
 
Cass xx


Saturday, 12 December 2020

Vera Lane Studio - December

Happy Saturday!

Today I'm sharing my Vera Lane Studio DT project featuring December which is available in the Vera Lane Studio Etsy shop.

I coloured her with my copic markers adding some knitted effect to her headband with a pink Prismacolor pencil. I also added some clear Wink Of Stella to her hair to give it some icy sparkle.

I die cut my tag using the MFT stitched tags die and inked it with Spun Sugar Distress Oxide using my blending brush. I then inked the circles from the AALL And Create #338 Background Noise with my Versamark clear ink pad and then added some opaque white WOW embossing powder and heat embossed it.


 I punched the tiny snowflakes using a punch and glue them to the tag. I then splattered some Molotow white acrylic pain over the whole tag.

Next I adhered my image in the bottom right corner and the sentiment to the top left.

To finish off I added a pink seam binding bow.


Image - Vera Lane Studio (December)

Colouring Medium - Copic Markers

(E13,11,21,00,R21,RV10,R81,83,RV34,C0,1,3,5,B00,02,0,E70)

Tag Die - MFT Stitched Tags

Distress Oxide - Spun Sugar 

Stamps - AALL And Create #338 Background Noise

Snowflake Punch

Wow Embossing Powder

Molotow White Acrylic Paint Pen

White Gel Pen

Clear Wink Of Stella

Pink Seam Binding

We would love to see your makes over on the Vera Lane Studio Facebook Group or tag us on Instagram using #veralanestudio
Cass xx


Saturday, 5 December 2020

Vera Lane Studio - Not Driving Home For Christmas

Happy Saturday!

Today I'm sharing my Vera Lane Studio DT project featuring 3 sets which are available in the Vera Lane Studio Etsy shop.

I wanted to make a bright Christmas coloured project and inject a bit of humour. Goodness knows we need some after the year we've had. I decided to use the Chris Rea song Driving Home For Christmas or as in the case may be, Not Driving Home For Christmas depending on local travelling and visiting restrictions.

I've used the car from the Wheels set, the girl from New Day and the tree from Merry.

I know it's not the typical American red truck but I love this little red car so added the tree on top. The girl from New Day looks like she's shaking her finger and saying "no" so I thought she would be perfect.


I brayered red, white and green acrylic paint onto my gelli plate and pressed down onto it with some bubble wrap to add some texture. I then used Vanilla acrylic paint to lift the print. I then stamped AALL And Create #399 Framework Elements in Rustic Wilderness Distress Oxide and #352 Circled Numbers in Festive Berries. Next I stamped #434 Newsprint Numbers in Versafine Clair Nocturne black.  I then used the top of two pen lids and stamped circles in Snowflake white.

Next I adhered my images and added some doodling below them with my black fineliner. I added the word Journey from the AALL And Create washi tape in the top left corner and then printed out my sentiment, underlining the word NOT in red. I finished by adding this to my project.

I loved making this tongue in cheek scene and hope it brought a smile to your face.


Images - Vera Lane Studio (Wheels, New Day, Merry)
Colouring Medium - Copic Markers
(E13,11,21,00,R14,27,46,G24,46,28,C3,1,YR21,23,27,0)
Stamps - AALL And Create (#434 Newsprint Numbers, #399 Framework Elements, #352 Circled Numbers) 
AALL And Create - Washi Tape
Paints - Paperartsy Fresco Snowflake, Vanilla, Dina Wakley  Lime, Red Acrylic
Distress Oxides - (Rustic Wilderness, Festive Berries)
Versafine Clair Nocturne
Brayer
Gelli Plate
Bubble Wrap 
Black Fineliner
 

We would love to see your makes over on the Vera Lane Studio Facebook Group or tag us on Instagram using #veralanestudio

Cass xx
 
White Gel Pen


Saturday, 28 November 2020

Vera Lane Studio - Parrot Love

Today I'm sharing my Vera Lane Studio DT project featuring Parrot Love which is available in the Vera Lane Studio Etsy shop.

I used my Gelli plate to make my background. It was inspired by a Tracy Evans Facebook Live I watched to create the 4 quarters.

I added red acrylic paint to one quarter of the gelli plate and brayered it. I then put the stencil on top and patted down with scrap paper to remove excess paint. I did the same with each quarter alternating between the red and the Paperartsy Fresco Double Denim blue paint. I then lifted the print using Paperartsy Fresco Honeydew.

I random stamped the AALL and Create #262 Mesh stamp using Candied Apple Distress Oxide, and then #304 Heartfelt using Versafine Clair Paradise. I then splattered some Molotow white acrylic paint over it all and finished off by dabbing some Paperartsy Fresco Snowflake white paint around the edges.

Next I coloured my images with my copic markers adding some white highlights with my gel pen. I added some AALL and Create plain washi tape under where I wanted the branches to go and stamped with the #304 heartfelt stamp again. I adhered the branches and drew a line between them for one of the parrots to perch on. I then added the other parrots. I used another piece of plain washi tape I'd stamped on and added the girl and her parrot to this.


I finished off by adding the sentiment from the stamp set.

 
Images - Vera Lane Studio (Parrot Love)
Colouring Medium - Copic Markers
(E13,11,21,00,R24,27,46,89,B93,95,97,26,C1,3,E42,43,44,E23,25,29,0)
Stamps - AALL And Create #262 Mesh,#304 Heartfelt
Stencil - AALL And Create #96 Dandelion Field
Gelli Plate
Paints - Paperartsy Fresco (Double Denim,Honeydew,Snowflake)
Red Acrylic
Inks - Distress Oxide Candied Apple, Versafine Clair Paradise
AALL And Create - Plain Washi Tape
White Gel Pen
Molotow White Acrylic Paint Pen 

We would love to see your makes over on the Vera Lane Studio Facebook Group or tag us on Instagram using #veralanestudio

Cass xx

Sweet Stampin' Challenge

 Saturday and time for another 

Sweet Stampin' Challenge

 
The theme from Team Wendy is
 Spots Or Stripes

I've made another slimline card using another elf!
 
This elf digi I bought way back in 2012 when Birdie Brown had a digi stamp shop on Etsy. I coloured him with my Copic markers.
I made my slimline card blank using green card and added a panel of red and white stripey paper. I cut a panel of white card and adhered my elf to it.
I then doodled around the edge with my black fineliner.
Next I cut the sentiment die in green card and added it.
To finish off I added some pearls.
I love this image so much.


Image - Birdie Brown (Elf)
Colouring Medium - Copic Markers
Papers - AMB Illustrations
Die - Creative Expressions
Black Fineliner
White Gel Pen
Pearls

Don't forget to pop by the challenge blog and see all the fab DT creations from Team Wendy.
Remember you MUST  use a stamp (rubber or digi)
TFL
 
Cass xx


Saturday, 21 November 2020

Vera Lane Studio - A Very Vera Lane Holiday

I'm sharing my second Vera Lane Studio DT project today featuring  A Very Vera Lane Holiday bundle which is available in the Vera Lane Studio Etsy shop. It's fantastic value for money as there are 12 digis in the set including lots of holiday sentiments.

 I started with a circle of kraft card which is perfect gingerbread cookie colour. I stamped the circles from Janet's AALL And Create #338 Background Noise stamp set in Vintage Photo Distress Oxide all over the circle. I then used one of the circles in Janet's AALL And Create #96 Dandelion Field stencil and coloured through it with Festive Berries and Twisted Citron Distress Crayons randomly over the base. I then ran around the circle with my white gel pen a few times to give a thicker (icing) line. To finish off the base I added some white paint splatters using my Molotow white acrylic paint pen.

I then coloured the gingerbread man and woman from the set with my copic markers. I also coloured one of the hats from the Boutique Hats collection set and added it to the gingerbread man. 

I printed out one of the sentiments from the set twice. One with a green background and one with a red background and cut them out.

To finish off I added a bow made of baker's twine.


 Images - Vera Lane Studio (A Very Vera Lane Holiday, Boutique Hats)

Colouring Medium - Copic Markers (E31,33,35,C1,3,0,R14,27,46,G24,46,28,R22,21,20)

Stamps - AALL And Create #338 Background Noise 

Stencil - AALL And Create #96 Dandelion Field

Distress Oxide - Vintage Photo

Distress Crayons - Festive Berries, Twisted Citron)

Kraft Card 

Molotow White Acrylic Paint Pen

White Gel Pen

Baker's Twine

We would love to see your makes over on the Vera Lane Studio Facebook Group or tag us on Instagram using #veralanestudio

Cass xx


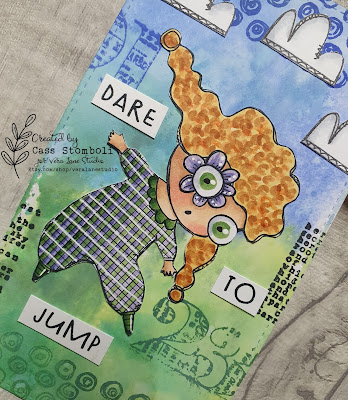
Vera Lane Studio - Just Jump

 Today I'm sharing my Vera Lane Studio DT project featuring Just Jump which is available in the Vera Lane Studio Etsy shop.

There are two versions of the girl in the set. One with a plain suit and one with plaid. Being Scottish I had to use the plaid version and make it tartan. I coloured her with copic markers and made her suit green and purple. I then added some white stripes using my white gel pen to give it a more tartan look. I also gave her red curly hair. Another Scottish stereotype...lol.

I cut out the tag using my MFT tag dies. I spritzed some Salty Ocean and Blueprint Sketch Distress Oxides on my glass mat and smooshed the top half of the tag in it. I then did the same with Twisted Citron, Lucky Clover and Rustic Wilderness on the bottom half of the tag this time.

 I then stamped the circles from AALL And Create #338 Background Noise in Rustic Wilderness at the bottom and Blueprint Sketch at the top. I also stamped the AALL And Create #434 Newsprint Numbers in the same colours top and bottom. I then used one of the scripts from Background Noise and stamped it in Versafine Clair Nocturne around the edges. I stamped the clouds from the AALL And Create #257 Lil'Magic stamp set and added to the sky.

To finish off I added the sentiment from the set.
 

Images - Vera Lane Studio (Just Jump)

Colouring Medium - Copic Markers (E13,11,21,00,R21,G24,46,28,BV11,13,17,Y23,E97,99, C3,1,0)

Distress Oxides - Salty Ocean, Blueprint Sketch, Twisted Citron, Lucky Clover, Rustic Wilderness

Stamps - AALL And Create #338 Background Noise, #434 Newsprint Numbers, #257 Lil'Magic

Ink - Versafine Clair Nocturne

Tag Die - MFT

White Gel Pen 

We would love to see your makes over on the Vera Lane Studio Facebook Group or tag us on Instagram using #veralanestudio

Cass xx


Saturday, 14 November 2020

Vera Lane Studio - Winter To Spring

 Happy Saturday!

Today I'm sharing my Vera Lane Studio DT project featuring Winter to Spring which is available in the Vera Lane Studio Etsy shop. 

There are  7 digis in the set and I decided to use the Winter set for my card. I coloured the girl and the trees using my Copic markers and cut them out. I also printed out the sentiment, cut it out and inked it.

For my background I spritzed some Frayed Burlap and Speckled Egg Distress Oxides on my glass mat and smooshed my card in it. Once it was dry I added some Glitter Snow Paste using a spatula to create the snow at the bottom. I then used  Janet's AALL and Create Stencil #96 Dandelion Field and spread the paste carefully through some of the circles to create the snow over the rest of the card. It picked up some of the Frayed Burlap colour from below but I like the aged look it gave.

I then stamped the Merry Christmas from Janet's AALL And Create #413 Merry And Bright stamp set over the background in Frayed Burlap and also #383 Scripted Hexagons by Bipasha BK. I added the sentiment to finish it off.


Images - Vera Lane Studio (Winter To Spring)

Colouring Medium - Copic Markers (E13, 11, 21, 00, BG11, 32, 13, 15, E30,31, 33, 35, E37)

Distress Oxides - Frayed Burlap, Speckled Egg

Stamps - AALL And Create (#413 Merry And Bright, #383 Scripted Hexagons)

Stencil - AALL And Create (#96 Dandelion Field)

Glitter Snow Paste

White Gel Pen

We would love to see your makes over on the Vera Lane Studio Facebook Group or tag us on Instagram using #veralanestudio

Cass xx

Sweet Stampin' Challenge

 Saturday and time for another 

Sweet Stampin' Challenge

 
The theme from Team Wendy is
 
Use Your Favourite Stamp
 
I don't have one single favourite stamp. I've got too many favourites. So I decided to go with my favourite of the moment which is this adorable little elf  called Buttons Elf from Sweet November Stamps. Isn't he just so sweet with his little teddy bear?

I coloured him with my copic markers and cut him out along with the candy canes. I used the Whimsy slimline scenic window die and cut it out in white card. I stuck it to my base card which I'd matted with a candy cane stripe paper.
I then added Buttons and the candy canes in their respective windows. I stamped the Elf & Safety sentiment and added it it to the top window.
I finished off with some flat back pearls.
Definitely a favourite!


 Image - Sweet November Stamps (Buttons Elf)
Colouring Medium - Copic Markers
Dies - Whimsy Stamps (Slimline Scenic Window)
MFT (Pierced Rectangles)
Pearls
White Gel Pen
Red Bow

Don't forget to pop by the challenge blog and see all the fab DT creations from Team Wendy.
Remember you MUST  use a stamp (rubber or digi)
TFL
 
Cass xx